Saturday, December 31, 2011

Ranch Sausage Stars

The family all headed up to cabin for New Years - and we did our annual New Years Eve meal as appetizers!!  Of course I had to try  some new ones!!  We had a little issue with getting the right ingredients - so if any one has a good spring roll recipe, let me know :)

These were really, really, really good!!  Pretty easy - my only suggestion would be to let the wonton bake a little longer....ours were good, but it was really hard to get them out of the pan - so they sort of broke apart as you ate instead of being bite size.  Other than that - they were super tasty!!

Makes 4-5 dozen
Ingredients:
1lb sausage, cooked
1 1/2 cups shredded cheddar cheese
1 1/2 cups shredded monterey jack cheese
1 cup ranch dressing
2.25 oz sliced black olives
1/2 cup green and red pepper, chopped
1 package wonton wrappers
canola oil

Heat oven to 350.  Mix all ingredients.

Press wrapper into a mini muffin pan.  Brush with oil and bake for 5 minutes.  Remove wrappers from pan and place on baking sheet.  Fill with mixture.

Bake 5 minutes or until bubbly.

Crab Spread

New Years up at the cabin - WOOT WOOT!!  So yeah - this app looks AWFUL!!  We had some "issues" with our meals this weekend....haha.  "We" (aka Ross) bought green taco sauce....but in all fairness - it did have chili's listed in the ingredients....so yeah, it was almost the same as chili sauce.  It actually still tasted good - just had to keep your eyes closed to eat it :)

Makes 2 cups - Recipe Girl

Ingredients:
12 oz cream cheese, at room temperature
2 tablespoons Worcestershire sauce
1 tablespoon lemon juice
2 tablespoons mayo
1/2 small onion, grated
6 oz chili sauce
6 oz can crab meat, drained and flaked apart
freshly chopped parsley

In a medium bowl, use a mixer and blend cream cheese, Worcestershire sauce, lemon juice, mayo, and onion.  Spread on a serving platter.  Spread chili sauce over - then sprinkle with crab meat.  Sprinkle fresh parsley on top.

Refrigerate for several hours.  Serve with crackers.

Sunday, December 25, 2011

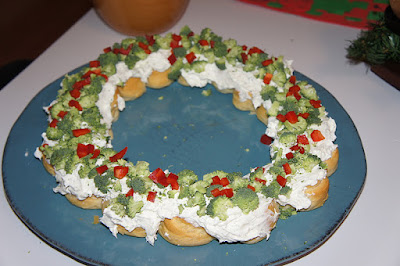
Christmas Wreath Appetizer

Had the "adult" cousins over to our house after Christmas Day for some games - so even though we had been eating all day I had to make up some apps!!  I made up everything for this app the day before - and then just assembled them when we got home - and they were a hit! (only had 2 left)....and look....it's a WREATH!!  :)

Taste of Home - 16 servings

Ingredients:
2 tubes (8 ounces each) refrigerated crescent rolls
1 package (8 ounces) cream cheese, softened
1/2 cup sour cream
1 teaspoon dill weed
1/8 teaspoon garlic powder
1-1/2 cups chopped fresh broccoli florets
1 cup finely chopped celery
1/2 cup finely chopped sweet red pepper

Remove crescent dough from packaging (do not unroll). Cut each tube into eight slices. Arrange in an 11-in. circle on an ungreased 14-in. pizza pan.

Bake at 375° for 15-20 minutes or until golden brown. Cool for 5 minutes before carefully removing to a serving platter; cool completely.

In a small bowl, beat the cream cheese, sour cream, dill and garlic powder until smooth. Spread over wreath; top with broccoli, celery and red pepper. Form a bow garnish with celery leaves. 

Herbed Goat Cheese Bites

So this was super good - but we did it a little different than it says below!  I didn't have time to cook the bread etc - so I just used leftover pita bread from our Pita Tree Appetizers - and served it that way!  It still tasted really good - and it was different than your normal cheese dip.  I really liked it!!


Ingredients:
1 tablespoon fresh flat-leaf thyme leaves
1 tablespoon fresh parsley leaves
1 tablespoon fresh tarragon leaves
1 tablespoon fresh mint leaves
1/2 cup sun-dried tomatoes in oil, drained and chopped
1 (8-oz.) goat cheese log, softened
12 slices of loaf bread
2 tablespoons extra virgin olive oil or cooking spray
Combine and finely chop the fresh herbs. Place the chopped herbs and sun dried tomatoes in a bowl and combine with the softened goat cheese until fully incorporated. Cover bowl in plastic wrap and chill at least 2 hours or up to 24 hours.
Preheat oven to 350°. Prepare the bread slices by cutting off the crusts. Cut each slice in half and gently press each half slice into muffin cups in muffin pans. Drizzle bread slices with olive oil or spray with cooking spray.
Bake the bread in muffin tins at 350° for 7 to 9 minutes or until crisp and lightly browned. Remove from oven; let cool in pans 5 minutes.
Place a dollop of the goat cheese mixture onto the toasted bread slices and serve.

Saturday, December 24, 2011

Pita Tree Appetizers

We are heading to the Sodahls for Christmas Eve - and we get to stay the WHOLE night long!!  First time for that - and first time for this app!!  Technically, new apps are not "allowed" to be introduced but these were so good - and hey....they were festive so it was ok :)

Betty Crocker - makes 32 servings

Ingredients:
4 flavored or plain pita folds or pita (pocket) breads (about 6 inches in diameter)
16 thin pretzel sticks, halved
1/2 cup fat-free sour cream
1/2 cup guacamole
2 tablespoons finely chopped parsley
1/4 teaspoon garlic-pepper blend
1/4 cup very finely chopped red bell pepper

Cut each pita fold into 8 wedges. Insert pretzel stick half into center of bottom of each wedge to form "tree trunk."

In small bowl, mix sour cream, guacamole, parsley and garlic-pepper blend. Spread about 1 teaspoon sour cream mixture on each pita wedge.

Blot bell pepper with paper towel to remove excess moisture. Sprinkle about 1/4 teaspoon bell pepper on each wedge or arrange to form a garland. If desired, cover and refrigerate up to 8 hours before serving.

Sodahl "secret" Cheese Ball

It wouldn't be Christmas Eve at the Sodahls without chex mix from Bruce, chicken wings and wild rice soup from Barb, and the cheese ball from Stacy!!  Stacy was in Atlanta this year - so the tradition was passed onto us - so I made Ross make it :) Tastes amazing - and is a hit at every party!!  (Stacy even won an award somewhere for best app....)


Ingredients:
2 (8oz) cream cheese
8 oz shredded cheddar cheese
Small jar Port Wine cheese (see picture)
Small jar Armour dried beef (see picture)
Sour cream
2 bunches of green onions
Crackers

Cut dried beef into small pieces.  Mix everything together in a bowl - and then squeeze with hands to form a ball.....snowman.....tree....whatever you want!!  (This is a good time to wear those kitchen gloves - keeps your hands all nice and clean!)

Then top with sour cream - and sprinkle green onions on top.  Super easy and Super tasty!!

Thursday, December 22, 2011

Menu Boards

For Christmas this year - I decided to make some menu boards for people!! (including myself)!  I saw this idea given to someone for their wedding, and being that I cook and come up with my menu each week - I figured I would pass the love on! 

It's SUPER easy to make - and if you don't have a cricut machine to make your letters - COME ON OVER!!  (Rossy just got me one for Christmas -- woot woot!!)


Supplies:
Picture frame
Scrapbook card stock
Cricut
Vinyl Letters
Dry Erase Marker

All I did was create the letters using Perrine's silhouette machine - and NOW I can use my cricut!!  I headed to Michael's and found the Vinyl Letters (they were about $10) - and then print and stick!!

Throw some pretty scrapbook card stock in the back of the frame - and attach a dry erase marker....and AWESOME!!!  Super easy and so fun!!

Wednesday, December 21, 2011

A gift for our "Brave Soldiers at Home"

My cousin Jake is deployed in Iraq right now - and being that it was Christmas and his first time not being there, I made a little something for my aunt/uncle/cousin.  It's a little homemade count down till he gets home!!


Supplies:
Glass Jar
Ribbon
Stickers
Picture
Candy Kisses

I wrote up a little note that said "Kisses from Jake - eat/take out a kiss from Jake each day - and when they are all gone your brave son/brother will be home!!"

I put extra kisses in so that he will for sure be home - but it's a fun way to see how close the day is coming!!

Tuesday, December 20, 2011

Stuffed Taco Shells

Ross is BACK!!!  WOOT WOOT!!  No more eating for 1 - and then having leftovers for the rest of the week :)  Ross was nice enough to make up this dish for me (and he remembered to take a pic - how awesome is he!!), since I was out visiting cutie Leah Assmann!!  He said it wasn't that hard to make - and it tasted GREAT!!  I just liked that it was a different spin on tacos!  I'm not a fan of the shell anyway - so this was perfect!!

Tiffany Blog

Ingredients:
1lb ground beef
1 package taco seasoning
1 4 once package cream cheese
12 large pasta shells
1 cup salsa
1 cup taco sauce
1 cup cheddar cheese (shredded)
1 cup Monterey jack cheese (shredded)
1 ½ cups tortilla chips (crushed)
3 green onions (chopped)
1 cup sour cream


In a fry pan cook ground beef and add taco seasoning and prepare according to package directions. Add cream cheese cover and simmer until cheese is melted. Blend well. Set aside and allow to fully cool. While burger is cooking, cook the pasta shells, drain and toss well with butter.

Pour salsa in the bottom of a 9 x 13 inch baking dish.

Stuff each shell with the meat mixture. Place the stuffed shells in the baking dish and cover the tops of the shells with taco sauce.

Cover and bake in the oven at 350 degrees for 30 minutes.

After 30 minutes, uncover, and sprinkle crushed chips and shredded cheddar and Monterey jack cheeses on top.  Cook for about 15 more minutes. Serve with sour cream, additional salsa, black olives or whatever you think goes good with tacos!

Sunday, December 18, 2011

Candy Cane Place Cards


We hosted the Sodahl "early Christmas" yesterday, and it was a blast!  Not only did I get to use ALL my Christmas Spode dishes, my individual salt/pepper and butter containers, but I made super cutie place card holders just for the occasion :)


These were super easy (well, if you have patience with a glue gun!).  All you need is a pack of little candy canes - and a glue gun/super glue.  Glue three of those bad boys together - take card stock and make the name card....and you are all set!!  How cutie!!!

I also wanted to give a shout out to our Christmas Meal - this was sooo great cause we were able to prepare everything ahead of time - and then just put stuff in the oven / stove top for an hour before we ate....perfection!! 

Menu:
Wild Rice
Croissants

Friday, December 16, 2011

I'm MELTING.....snowman cutouts

I decided tonight that we didn't have enough cookies (haha - yeah right!), so I wanted to make up these cute guys!  Actually - I wanted to give Martha Stewart a run for her money!!  How awesome are these cookies - they were super tasty, pretty easy to make, AND they are super cute and I got LOTS of comments on them at our "early Christmas party" :)


Ingredients:
Frosted White Sugar Cookies OR if you need a faster alternative - 1 package Betty Crocker Sugar Cookie Mix
10 large marshmallows
I batch of frosting Frosted White Sugar Cookies

Mix up your cookie dough recipe -  then just grab a golf ball sized chunk and squish it down until it's about 1/4-1/2 inch thick. Do not worry about the shape or how lumpy it is, the more misshapen the better! Bake according to recipe directions.

Once the cookies are cool, load them up with the cookie icing and spread it around with the back of a spoon, let some dribble over the edge for a "puddle" look.

Spray a microwave safe plate with cooking spray, and place marshmallows on the plate. Set the microwave for 30 seconds, but watch the marshmallows as they cook. Stop the microwave as soon as the marshmallows start to get puffy, do not let them double in size.  Spray your fingers with cooking spray or grease them up with shortening, and carefully pull the marshmallows off, by the base, and set them on top of the frosted cookies.

Then just decorate as you'd like :)

Thursday, December 15, 2011

Buffalo Grilled Cheese

So I was really excited for tonight's cookbook club.....1. because it was GRILLED CHEESE night!  and 2. Because I got to use my new panini grill!!  (Thanks mom and dad!)  The recipes all give instructions how to use a pan - but if you have a panini grill, use that!  It was SUPER easy - and cooked the sandwiches perfectly!  The clean up was super easy - and the sandwich might have even tasted better on it -- hehe!!  But yeah - this sandwich.....GREAT!  ahhh I love hot sauce.....blue cheese....and chicken.....oh, and bread....doesn't get much better in my world!!


Ingredients
4 thick slices of french bread
2 pads of real salted butter
1 tablespoon blue cheese salad dressing
3 tablespoons organic cream cheese
2 tablespoons crumbled blue cheese
1 tablespoons shredded cheddar
1/2 cup cooked shredded organic chicken breast
1.5 tablespoons Frank's hot sauce
Once you've got everything out, combine all the cheeses into a small bowl.  Stir together until you get a smooth consistency.  Now combine your finely chopped chicken with Frank's hot sauce and stir.

Smear on a little over a tablespoon of the mixture onto each slice of bread (or however much you want!).  Then divide half the chicken on top of each piece of the smeared bread.  Now smear the other slices of bread with cheese and put the top on the sammie.

Gently apply 1 pad of butter to the top of the grilled cheese and place it butter side down in your pan.  Once they're in the pan, turn the heat to high and butter the other side of the bread.

This cheese mixture will melt really quick, so make sure to check the brownness of each grilled cheese about every thirty seconds or so.  It'll probably take about a minute and a half once the pans hot and you'll want to take it off when it looks like this on both sides.

Apple and Brie Grilled Cheese

Hmmm we almost ate all the brie before it made it into this sandwich - but WOW!...Who knew Grown up grilled cheese could be so great!!  This was super yummy - and how easy !!  ahhh next go to grilled cheese in this house!!
 
Serves 2

Ingredients:
4 slices of Italian bread, about 1/2" thick
1 large apple, thinly sliced
4 oz brie, thinly sliced
2 T apple butter
1 T butter

Spread apple butter on one side of bread slices.  Layer brie and apple slices on one side and top with remaining slice of bread.  Heat griddle over medium heat and melt half of the butter on the pan.  Add sandwiches and spread remaining butter on tops of bread.  Let cook about three minutes and then flip.  Cook an additional two to three minutes until cheese is melted and bread is toasted as desired.  Cut and serve.

Avocado Fries

Cookbook in the house - and "Mr" Rogers got "Oil Crazy!!!"  :)  Thank god Rogers was here - she was the master of the oil....as well as cutting avocadoes in french fry shape!  I thought this was going to be a little "eh" - but um, these were amazing!!  Even the ones we burnt the first round (oil too hot) were yummy!!  It was super weird eating fried avocadoes - but dang...I wish I had made these earlier....super good!!


Ingredients:
Oil For Frying
2 Avocadoes
2 Eggs, beaten
1 and 1/3 Cup Bread Crumbs (used panko - worked good!)
1 Teaspoon Lemon Pepper
1/2 Teaspoon salt
1 Teaspoon Lemon Pepper
1/2 Teaspoon Salt
1/4 Teaspoon Cumin

Cilantro Lemon Dipping Sauce:

5 Tablespoons Mayonnaise
3 Tablespoons Fresh Cilantro, chopped
Juice from 1/2 of Lemon

In a medium-sized bowl, mix together the bread crumbs, lemon pepper, salt and cumin. Set it aside.  Cut the avocados in half and then slice them vertically into 4 inch by 1 inch wedges. Set them aside
 
Heat the vegetable oil to 335 degrees Fahrenheit in a large frying pan, adding enough oil so that the oil is about 3 to four inches deep.
 
Dredge the avocado slices in the breadcrumb mixture, then in the egg mixture, then in the breadcrumb mixture again. Place them in the hot oil and fry them for about 2-3 minutes, or until golden brown. Remove them with a slotted spoon or tongs, and set them on a plate lined with paper towels to absorb the excess oil.
 
Allow them to dry for 10 minutes, then transfer them to a serving tray and serve them immediately with the Cilantro Lemon Dipping Sauce.

For the Cilantro Lemon Dipping Sauce, place the mayonnaise, cilantro, and lemon juice in a blender and mix until smooth and creamy in texture.

Saturday, December 10, 2011

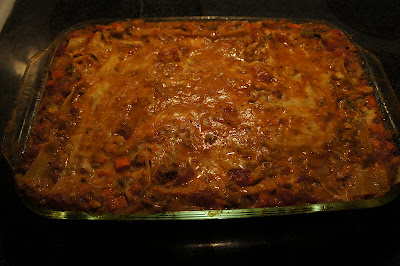
Lasagna

Had Miss Anna over for dinner tonight - and after being at 12 bars of Christmas last night, this was the best meal ever!!  I am in the search of the perfect lasagna - and this was pretty close!!  It was so different than any I've made before - and it had the best flavor!  It did take a little time to make / bake - but it was worth it!  If you got some time on your hands - try it out :)
Serves 12 - OBB cookbook
Sauce Ingredients:
1/2 lb ground beef or Italian sausage
2 (15-oz) cans Italian-style diced tomatoes
15-oz can tomato sauce
5-6 cloves of garlic, minced or pressed
1 onion, chopped
1 zucchini, chopped or grated
2 carrots, peeled and chopped into small pieces
2 stalks celery, chopped
2 teaspoons sugar
About 1/4 teaspoon baking soda (this neutralizes the acid)
Salt and pepper to taste

In a large saucepan or skillet with a lid, brown ground beef (or sausage), onions, and garlic until meat is cooked and onions are tender.

Add the remaining ingredients to the cooked meat, stir, and bring to a simmer. Cover, turn heat to low, and simmer for an hour, stirring occasionally. After an hour, remove from heat.

Lasagna Ingredients:
1 recipe of sauce (see above)
12 no-boil lasagna noodles
8 oz shredded mozzarella, divided
4 oz shredded fresh Parmesan
1 egg, lightly beaten
16oz tub container ricotta cheese

Béchamel Sauce Ingredients:
1/4 cup (1/2 stick) real butter, NO SUBSTITUTES
1/4 cup white flour
2 1/2 cups milk

Preheat oven to 350.

To prepare Béchamel sauce, melt butter over medium-low heat in a medium saucepan. When melted, whisk in flour until combined. Slowly add milk, whisking constantly. Heat until bubbly and thickened to a medium consistency that that looks like this on a spoon:

Mix the Béchamel in with the red sauce.  After you've made (and mixed) the Béchamel, combine 6 oz. mozzarella (about 1 3/4 c.), ricotta, Parmesan, and the beaten egg.

Using a ladle that measures 1/2 cup (or a 1/2 c. measuring cup), spread 1 cup of sauce onto the bottom of a 9x13 pan. Add 3 noodles. Spread a layer of the cheese mixture. Spread 1 1/2 cups sauce and repeat so you have 4 layers of noodles. You should end with a layer of sauce on top. Sprinkle with remaining mozzarella (and some extra Parmesan if you have some left over).

Cover tightly with foil and bake about 50 minutes.

Remove from oven and remove foil. It will probably look a little runny. Don't be scared--you still need to let it stand about 15-20 minutes. During that time, it will thicken up nicely and it won't even be that oozy when you cut it.

Wednesday, December 7, 2011

Orzo Chicken

Ok - I didn't even know what orzo was till a couple weeks ago, and I already found another recipe with it in it!  I had boot camp and dance tonight - so again, I needed something FAST FAST and FASTER!  This was super quick to throw together - and then I was able to get ready while it baked.  It probably isn't super healthy for you with that thick cream - BUT the flavor was totally worth it!  It's super yummy....AND I get leftovers AGAIN tomorrow!!  Perfect serving for 2 :)

Serves 2: Best Casserole Cookbook Ever

Ingredients:
2 tablespoons flour
salt / pepper
2 boneless, skinless chicken breasts halves
3/4 cup plain orzo
1 cup chicken broth
1/2 cup finely chopped onion
1 tomato, diced
1/2 cup heavy cream
1/2 cup sour cream
1/2 cup shredded mozzarella cheese

Preheat the oven to 400 - coat a shallow 2qt casserole with cooking spray. 

Combine the flour, salt, and pepper in a shallow bowl - and coat the chicken halves.  Heat the chx broth so it's hot!

Spread out the orzo in the bottom of the casserole dish and pour the hot chicken broth over it.  Top with the onion, tomato, and seasoned chicken breasts.

Mix the heavy cream and sour cream together - spoon over chicken.  Bake, uncovered, for 30 minutes or until chicken is cooked through.  Sprinkle with the cheese and let stand for 5 minutes, until the cheese is melted.

Tuesday, December 6, 2011

Lemon Garlic Spaghetti

Bingo and Donni bday celebration tonight - needed something quick and easy, but yummy!!  This was awesome!  I didn't really think it would be anything special, but it was so so good!  AND it made enough for my lunch the next day too - a perk to cooking for one :)  But yeah - looking for an alternative to your normal spaghetti - do it up!  Super good!!

Serves 2

Ingredients:
4 oz dry spaghetti
1/4 cup grated Parmesan
2 teaspoon olive oil
1 clove garlic
1/2 lemon
2 tablespoon pine nuts
5-6 basil leaves, chiffonaded

First, start your garlic oil. Pour in olive oil and chopped up garlic into a small frying pan and let it cook over low, until the garlic starts to brown on edges. Immediately remove from heat and reserve.

While that’s starting up, boil up some spaghetti.

Chiffonade some basil leaves. Fresh is, as usual, the best.  Then you take some cheese…Some pine nuts…
And dump it into a large bowl, with the garlic oil, garlic chunks and all. Squeeze in lemon juice. Throw in the spaghetti and toss until well combined. Plate, crack some black pepper on it, and nom.
Sunday, December 4, 2011

Guac Football Field

Girls Fantasy Football Team Party today!!!  Woot Woot!!  I may not be winning....WE HAVE TO BEAT DOBIE!!...but we are still having a blast playing and smack talking each other.  I'm even learning a little about the players - and don't mind watching the pregame show so I learn a little!

In honor of our party - I had to make all food football related....take a look at a couple of the apps I made: this awesome football field (see below), Deviled Footballs and Cheesy Football.

For the football field - I just made up my famous Guac!! recipe - and then shaped into a field.  My plan was to pipe the field lines with sour cream - but I got lazy and made them with frosting.....don't do this!  :)  We just ate around them....haha!!  The goal posts I just made by super glueing toothpicks together!  So much fun and so tasty!!  Heart my Fantasy Football Team!!  (for all you ladies that the snow "hated on" - we missed you!!)

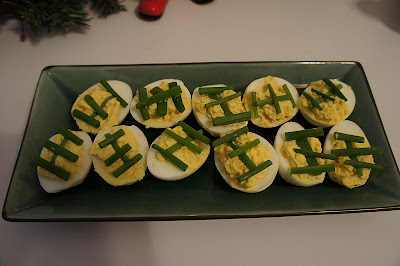
Deviled Footballs

I made up this recipe for Deviled Eggs - and then had to put a Football twist on them!!  Um yeah - football everything around here.  I just used green onions to make the laces...next time probably take the time to make the laces smaller or something so they look a little more football like - but hey , they still are cute :)

Cheesy Football

Super bowl party goers pay attention - how cute is this ?!  You can pretty much use any cheese ball recipe - and then shape into a football!  Thought it was fun!  This wasn't my favorite cheese ball recipe, but it was pretty good - and hey, it looked cute :)  OH - and look....my new platter got a cutie football for the occasion :)

Ingredients:
2 pkg. (8 oz. each) PHILADELPHIA Cream Cheese, softened
1 pkg.  (8 oz.) KRAFT Shredded Sharp Cheddar Cheese
1/2 cup KRAFT Grated Parmesan Cheese
1/2 cup  MIRACLE WHIP Dressing
1/4 teaspoon pepper
2 green onions, chopped
1 cup chopped PLANTERS Pecans
2 tablespoons pimiento strips
RITZ Crackers

Beat first 5 ingredients with mixer until blended. Stir in onions. Refrigerate several hours.

Form into football shape; coat with nuts and add pimentos for the lacing. Serve with crackers.

Sunday, November 27, 2011

French Onion Soup - Houlihan's style

Sodahl "french onion soup bake off" is here!!  We ate at Houlihan's last week - and of course got their yummy french onion soup.  Ross and I used to be obsessed with trying new restaurants in the search for the perfect french onion!!  Grandmas in Duluth had a close first - and now that we have tried Houlihan's that might be the best...we had a discussion that night about trying to make our own - so here we are!!

I found some recipes for french onion soup - so we decided to try 2 different recipes and declare a winner!  I modified a bunch of different recipes I found to make this one as close to the Houli's recipe as I could.....AND.......it was GREAT!!  We didn't have much broth - so not sure if when I cut the ingredients in half it all boiled out - but Ross didn't have much besides the onion / absorbed bread / cheese!  This was really close and actually really good!!  Who needs to go to the restaurant anymore - save the money and make it ourselves!!  So good!!

Serves 6

Ingredients:
6 cups onions, thinly sliced
4 cups beef broth
1/4 cup butter
6 slices Provolone cheese
6 slices toasted French bread (I actually used basic rolls I had....)
2 teaspoons Worcestershire sauce
1/4 cup dry white wine
1 teaspoon sugar
salt and pepper

Saute the onions in the butter until they are tender, then add the wine, sugar, beef broth and Worcestershire sauce.

Add some salt and pepper - bring soup to a boil and then turn the heat down and cook over a moderate heat for about 20 minutes.

Preheat the oven to 350 - ladle the soup into ovenproof bowls (these are my rents - aren't they cute!!  They worked perfect) and add a slice of toasted bread to each.

Put one slice of cheese over each piece of toast and bake for 10 minutes until the cheese is golden brown and bubbling.

French Onion Soup

Round 2!! I didn't think this was as good as the French Onion Soup - Houlihan's style  - BUT it was super tasty still.  It just tasted a little bit more "winey" - and that's probably because there is wine involved :)  I really liked the taste of this - but if you are going for the "best" / Houl's style - then the other soup was right on.

I think next time I'll do a combo of the two: more broth in the first one, use bay leaves / thyme sprigs, and try the Gruyere cheese instead of the Provolone.  AND buy some french onion soup bowls :)  Thanks rents for letting me borrow!!  They worked great!!

Serves 6

Ingredients:
1/2 cup unsalted butter
4 onions, sliced
2 garlic cloves, chopped
2 bay leaves
2 fresh thyme sprigs
Kosher salt and freshly ground black pepper
1 cup red wine
3 heaping tablespoons all-purpose flour
2 quarts beef broth
1 baguette, sliced
1/2 pound grated Gruyere

Melt the stick of butter in a large pot over medium heat. Add the onions, garlic, bay leaves, thyme, and salt and pepper and cook until the onions are very soft and caramelized, about 25 minutes.

Add the wine, bring to a boil, reduce the heat and simmer until the wine has evaporated and the onions are dry, about 5 minutes.

Discard the bay leaves and thyme sprigs. Dust the onions with the flour and give them a stir. Turn the heat down to medium low so the flour doesn't burn, and cook for 10 minutes to cook out the raw flour taste.

Now add the beef broth, bring the soup back to a simmer, and cook for 10 minutes. Season, to taste, with salt and pepper.

When you're ready to eat, preheat the broiler. Arrange the baguette slices on a baking sheet in a single layer. Sprinkle the slices with the Gruyere and broil until bubbly and golden brown, 3 to 5 minutes.

Ladle the soup into bowls, top each with 2 slices of bread and top with cheese. Put the bowls into the oven to toast the bread and melt the cheese.

Little part of Heaven Sandwich

We are having a Sodahl "French Onion Soup bake off" today....so I wanted something easy, new, and tasty to go with the French Onion Soup - Houlihan's style - so here is this heavenly sandwich!!  It was really good - and different enough that I had to post it!  It has so many great veggies - it made me feel healthy :)

6 Sisters blog

Ingredients:
Whole Wheat Ciabatta bread (rolls)
Swiss Cheese (or any kind of cheese you want)
Ham or Turkey
an Egg (egg whites)
Avocado
Tomato
Spinach (I used basil since I had that leftover from yesterday....awesome!)
red onion
little bit of mayo (miracle whip is what I use)
honey Mustard

First preheat oven to broil. Then take a small pan frying pan on the stove and heat it to high. Once the pan is hot take your raw egg and get the yolk out. Then cook egg in the pan so it is small enough to fit on sandwich. While it is cooking,  put cheese on bread and broil it on a cookie sheet for 2 minutes. Any longer and the edges burn.

Then just start putting the sandwich together!

Saturday, November 26, 2011

Orzo Salad

Man - I'm a cooking machine this week.  I think it's because Ross is going to be out of town for work, so I'm trying to get all my new recipes in :)  We had a busy day today "Decking the Sodahl halls" - so I'm so glad I had this on the menu.  Super easy - and super awesome meal!!  We just made this up with some hash brown potatoes and steak!! 

Giada Family Dinners: 6 servings

Ingredients:
4 cups chicken broth
1 1/2 cups orzo (Italian pasta....looks like rice though)
15 oz can garbanzo beans, drained and rinsed
1 1/2 cups mixed red/yellow teardrop tomatoes or grape tomatoes, halved
3/4 cup finely chopped red onion
1/2 cup chopped fresh basil
1/4 cup chopped fresh mint
3/4 cup Red Wine Vinaigrette
salt and pepper

Bring the broth to a boil in a large, heavy saucepan over high heat.  Stir in the orzo.  Cover partially and cook, stirring frequently, until the orzo is tender but still firm to the bite, about 7 minutes.  Drain the orzo through a strainer.  Transfer the orzo to a large, wide bowl and toss until the orzo cools slightly.  Set aside to cool completely.

Toss the orzo with the beans, tomatoes, onion, basil, mint, and enough dressing to coat.  Season with salad with salt and pepper - and serve at room temp.

Red Wine Vinaigrette

Had this with the Orzo Salad - super good!!  I made a little extra cause I wasn't sure how much the salad was going to take - so if I eat this with anything else, I'll post :)

Giada Family Dinner: makes 1 3/4 cups

Ingredients:
1/2 cup red wine vinegar
1/4 cup fresh lemon juice
2 teaspoons honey
2 teaspoons salt
3/4 teaspoon pepper
1 cup olive oil

Mix the vinegar, lemon juice, honey, salt and pepper in a blender.  With the maching running gradually blend in the oil.  Season the dressing to taste with more salt and pepper, if desired.

Friday, November 25, 2011

Loaded Baked Potato Dip

Masters are coming over tonight for some dindin tonight - so Miss Meghan brought over the Garlic Artichoke Dip - and I made up this mean dip, fries and Dressed Up Sloppy Joes !!  Dip is super yummy!!  Ross and I had it again with Saturday nights dinner with some hashbrowns - worked great!!

My recipes.com

Ingredients:
2.1-oz package fully cooked bacon slices
16-oz container sour cream
2 cups (8 oz.) freshly shredded sharp Cheddar cheese 1/3 cup sliced fresh chives
2 teaspoons hot sauce
Garnishes: cooked, crumbled bacon; sliced fresh chives; freshly cracked pepper

Serve with: waffle fries

Microwave bacon according to package directions until crisp; drain on paper towels. Cool 10 minutes; crumble. Stir together bacon and next 4 ingredients. Cover and chill 1 to 24 hours before serving. Garnish, if desired. Serve with crispy, warm waffle fries. Store leftovers in refrigerator up to 7 days.

Dressed Up Sloppy Joes

We have tried a couple different sloppy joe recipes - and this was really good, but it was sweet!!  It was very "sloppy" - but made eating it so much more tastier.....haha.  I LOVED all the different options of making this meal up too - it was BLACK FRIDAY SHOPPING day today, so crock pot = best invention ever!!  It was ready to go when we got home - and then just kept it warm till the Sodahls / Masters were ready to eat!!  Perfection :)

OBB Cookbook

Ingredients:
1 l. lean ground beef
Seasoning salt to taste
1 medium onion, minced
1/2 green pepper, minced
3-4 cloves garlic, minced or pressed
3/4 cup ketchup
1 teaspoon mustard
3 tablespoons + 1 teaspoon brown sugar
1 1/2 teaspoons red wine vinegar
3/4 teaspoon Worcestershire sauce
3 tablespoons tomato paste
1/3-1/2 cup water to reach desired consistency
Freshly ground black pepper to taste
6 hamburger buns
 
Stovetop Instructions:
Brown ground beef with onion, green pepper, and garlic. Season to taste with seasoning salt. Add in mustard, ketchup, brown sugar, red wine vinegar, and Worcestershire sauce. Combine tomato paste and water and add to hamburger mixture. Add more water if desired. Season with freshly ground black pepper to taste. Cover, turn heat to low, and simmer for 30 minutes, stirring occasionally. Serve on hamburger buns.
 

Crockpot Instructions:
Brown ground beef with onion, green pepper, and garlic. Season to taste with seasoning salt. Transfer to slow cooker. Add in remaining ingredients and combine well. Cook on low for 3-4 hours and serve on hamburger buns.
 

Freezer Instructions:
Brown ground beef with onion, green pepper, and garlic. Season to taste with seasoning salt. Transfer to a freezer-safe container. Add in remaining ingredients and combine well. Freeze. When ready to cook, transfer to a slow cooker and cook on low to 3-5 hours. Serve on hamburger buns.

Garlic Artichoke Dip

Thanks to Miss Meghan for this yummy and "loving" (get it - cause it's a heart shaped dish....) app!!  It was super good - and was gone in like 5 minutes!!  haha  She added some spinach since most artichoke dips are "spinach artichoke dip' - and we added some hot sauce to this loveliness.  We are the friends of spice over here tonight!!  YUM!! 

OBB Cookbook

Ingredients:
2 (8-oz) packages cream cheese (light works great), softened
1 cup mayonnaise (no Miracle Whip or fat free mayonnaise, although low-fat mayo also works great)
1 cup (packed) shredded Parmesan cheese (try to get a wedge and grate it yourself; the pre-shredded stuff in a bag doesn’t melt well)
12-oz. jar MARINATED artichoke hearts, drained and chopped
6-7 cloves garlic, minced
 
Preheat oven to 350. In a large bowl, mix the softened cream cheese with the mayonnaise and shredded Parmesan cheese. Gently add in the chopped artichoke hearts and minced garlic.
 
Place the mixture into a 9″ pie plate (or divided evenly among smaller dishes) and bake for 25-30 minutes or until it’s lightly browned and bubbly on top. Serve hot with slices of bread and/or tortilla chips.

Thursday, November 24, 2011

Ross is 30!!!

Hubby joined the DIRTY 30's!!!  Because I'm impatient - I had already given him his bday present, but I couldn't have his actual birthDAY come and go without doing anything!!  Figured I would get him a balloon for every day he has been on this earth (and weirdly - I've known him for 1/2 of those!).

It was a super fun idea - and I used it as my "card".  I just tied a "reason why I love you..." to each balloon string - and then when he came home and wondered why our bedroom door was closed - BAM!!  Balloons everywhere....you are OLD!!  :)

Love you honey!!

Oreo Turkeys

HAPPY TURKEY DAY!!!!!!  I hope everyone had a GREAT and THANKFUL Turkey Day :)  ahhh I love today!!  So much to be thankful for - AND I love all the traditions!!  From the Turkey Trot 5k to start the day - to the dressing my grandpa used to make - to the sleigh ride song - to playing bingo with buttons -- to the grand lighting of the house!!  I LOVE it all :)

We are heading to the Sodahls first so I made up Bestemor's recipe - check it out here: Sweet Potato Casserole.

And then we are heading to the Ronhovdes for turkey dinner round two :)  I decided to make this cutie dessert!!  I'll be honest - it took some  time......it's pretty putsy, but look how cute they are!!  You could use them for place card holders OR just as a yummy dessert!!  (The little kids had some issues making it through dinner to eat these bad boys!)


Ingredients:
Double Stuff Oreo Cookies (**has to be double stuff - regular just doesn't work....trust me!)Candy Corn
Whoppers
Peanut butter Cups
Chocolate frosting
Yellow Frosting
Red frosting

First step:  Grab a cookie.  You don’t have to put frosting in there, but it holds in the candy corn a little better. Just give it a little squeeze of chocolate.

Then stuff in your candy corn.  If you’re in some sort of candy corn shortage, you can cut off the white tips to use later for your beaks.  I think the candy corn sticks in better with the tip so I leave it on.  Go ahead and do all of the cookies through this step.

Next put a dab of frosting on the opposite end of the cookie and secure it to the “base” cookie.  It helps to place them next to a wall as they dry so they stay put.

While those are drying, unwrap your PB cups.  Take a sharp knife and cut a sliver off of one end.  It helps to gently cut in a sawing motion so you don’t break the PB cup.

Once those are ready, flip your cookies over, but you may find it’s easy to keep them next to the wall.  My frosting was a bit soft, so they needed the extra support.  Place a dab of frosting on the pb cup, and place it on the cookie like a "body".

Now those little guys will need heads, so glue a whopper on there with frosting as well. I put frosting on the side of the whopper that hits both the cookie and the PB cup.  Wouldn’t want a turkey running around with its head cut off, would we??

While they’re still laying there, use a couple dabs of frosting (I used blue) for the eyes and glue on the white tip of a candy corn for a beak.  I used my red frosting to put the beak on - and then continued with that to add a little "wattle" to the turkey.  (Insert: Ronhovde Turkey Day humor.....)


"Wow - Heidi you have a lot!!" 
Scientific "Ronhovde" fact:
the skinnier you are -
the more weenis you have!!


And I'm back....Once the beak stays put you can flip them over and draw on some little white feet.  This was decided a step that could be skipped if not wanting to spend the time - however, I think it makes them look super cutie :)

And you're DONE!  GOBBLE GOBBLE!!

Sweet Potato Casserole

Because Ross's REAL birthday was on Turkey Day - he requested that we make his favorite Thanksgiving dish....his grandmas sweet potato recipe!  I was up for the challenge....Bestemor lives in Duluth so I called her to get the recipe - and she said she would mail it to me....I paused for a second....mail...not email....haha.  But I got the recipe in time - and now I have a cutie recipe card from her!

I was instructed to NOT get yams....DON'T GET YAMs!!  I wanted this to be perfect cause I was following some big shoes - but I didn't have time to run to the grocery store, so sir Rossy went for me.  When it came time to cook the sweet potatoes I noticed those bad boys weren't ORANGE.....uh oh....He had gotten YAMS!!!  hahahahahah  To be fair - the "grocery store" messed up cause the bins were labeled incorrectly....heheheh.  We decided to make them anyways - and let me tell you....THEY WERE AMAZING!!  We got TONS of compliments on them - so if yams aren't as good as sweet potatoes, I'm sure you could win some rewards with this recipe!!  It was super tasty!!

From Bestemor: Serves 8-10

Ingredients:
3-4 New Jersey sweet potatoes (about 3 cups mashed sweet potatoes)
1 cup sugar)
1stick butter (1/2 cup); soft
1/2 cup evaporated milk (carnation blend)
2 eggs
1/2 teaspoon nutmeg
1/2 teaspoon cinnamon
1/4 teaspoon salt
3/4 cup frosted flakes (crushed)
1/2 cup brown sugar
 1/2 cup chopped pecans/walnuts

Bake sweet potatoes in oven for about 1 hour - until fork tender (I did this the night before).  I basically just peeled off skin - chopped them in half - threw on a pan - topped with some olive oil - and cooked on 350 until they were done.  Then mash them up.

Blend potatoes, sugar, 1/2 stick butter, evaporated milk, eggs, nutmeg, cinnamon, and salt together in mixer.  Put into greased 9x13 pan.

 Melt 1/2 stick butter, add brown sugar, and stir in frosted flakes and nuts.  Spread on top of sweet potato mixture.

Bake at 350 for 25-30 minutes.

Wednesday, November 23, 2011

Green Bean Bundles

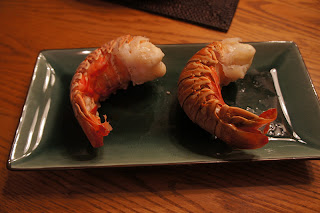
The Birthday Boy got to decide what he wanted for his pre-bday dinner -- AND it wasn't meat!!  haha  However - this was still considered a "feast"!  Ross's grandma sent us lobster for our anniversary - so we made that up with Crab legs with roasted red potatoes AND this awesome green bean side!!  I was thrilled to use my "star fish" on my platter -- hehe....I'm sure that was what Ross was thinking when he requested crab legs!!
But anyways - on to the awesomeness of these green beans....this is by far my FAVORITE way to eat green beans!!  Probably isn't super healthy anymore though with that bacon on there....but it's fancy, tasted AMAZING, and I'm in love!!  Try this - you won't be disappointed!!  It was super easy to make too - and a lot of it can be made ahead of time, so it would be super good for a large group!!  Ahhh I want more - right now!!
OBB cookbook - serves 8

Ingredients:
1 lb. green beans with the ends snapped off (buy or pick about 1 1/2 pounds so you'll have 1 lb. after the beans' ends have been snapped)
8 slices lean, regularly sliced bacon
3 tablespoons real butter (no substitutions!)
1 tablespoon rice vinegar
1 tablespoons white sugar
1 tablespoons minced red onion
1 clove minced garlic
1/4 teaspoon Kosher salt
 
Bring a large pot of lightly salted water to a boil.
 
If you're using fresh green beans, wash and snap the ends off.  Discard any sickly looking, overly skinny, limp, or yucky-looking beans.  Super-scientific, right?  When the water is boiling, briefly boil (blanch) the beans for 2-3 minutes or until you start hearing a popping noise and the beans have turned bright green.  Quickly drain and rinse in cold water until the beans have cooled.
 
If you're planning on completing the beans immediately, preheat the oven to 400 degrees F. 
 
On a cookie sheet, divide the green beans evenly into 8 piles.  Carefully bundle each pile of beans with one slice of bacon and return to the baking sheet.  This step can be done up to a day ahead of time.
 
When the oven is ready, place the pan in the oven and bake for 10-15 minutes or until the bacon is crisp and sizzling.  While the bundles are in the oven, melt the butter over medium-high heat in a small saucepan.  When the butter is bubbly, add in the onions and garlic and saute for 2-3 minutes or until the onions are softened and fragrant.  Reduce heat to low and add in vinegar, sugar, and salt.  Remove from heat and set aside.
 
When ready to serve, place bean bundles on a serving platter and drizzle with sauce.  Serve immediately.